

How Do You Remove Sticky Residue From Vintage Wood?
Last Updated: October 25, 2026
Quick Summary
Removing sticky residue from vintage wood should start with identifying whether the problem is adhesive sitting on top of the finish or the finish itself becoming tacky.
Use the least invasive method first, test anything new in a hidden area, and stop if you see dulling, cloudiness, color transfer, softening, or another change in the finish.
- Start by gently lifting loose paper or adhesive with your fingers or a plastic edge held nearly flat to the surface.
- A clean, barely damp cloth may help with some water-soluble residue, but avoid soaking the wood.
- Do not assume household oils, vinegar, adhesive removers, or solvents are safe for an unknown vintage finish.
- Avoid abrasive pads, steel wool, metal scrapers, heat, and steam.
- If the surface itself remains tacky after gentle cleaning, the finish may be deteriorating rather than dirty.
- For valuable, veneered, historically significant, or unknown pieces, stop before escalating and consider professional guidance.
Table of Contents
- Start by Identifying the Residue and the Finish
- How to Remove Sticky Residue From Wood Using the Least Invasive Method First
- How to Remove Sticker Residue From Wood Furniture Without Scratching
- Can You Use Goo Gone on Wood? What to Know Before You Reach for a Solvent
- How to Clean a Sticky Wood Table: Household Options Ranked by Risk
- Vintage-Specific Precautions and When to Call a Conservator
- Conditioning Dry Wood After the Residue Is Gone
- Test a Hidden Spot, Then Choose Your Wood Care Product
- Frequently Asked Questions
Start by Identifying the Residue and the Finish
Sticky residue on vintage wood may be old adhesive, tape residue, grime, or a finish that is beginning to break down. The safest approach starts with two questions: what is causing the stickiness, and what finish is already on the piece?
Vintage furniture may have varnish, lacquer, shellac, oil, wax, or another finish applied over the years. Those surfaces can respond very differently to moisture, cleaners, oils, and solvents.
Look closely before treating the sticky area, and start with the least invasive method.
Telling Sticker Glue, Tape Residue and Surface Breakdown Apart
Not every sticky patch is adhesive. Knowing the difference can help prevent unnecessary damage.
- Sticker glue and label residue: often appears as a raised or gummy film, sometimes with remnants of paper or a clear outline.
- Tape residue: may appear as a smeared or tacky strip, often along edges, drawer fronts, or previously taped areas.
- Surface breakdown: may feel tacky across the finish itself and can be accompanied by cloudiness, softening, discoloration, or an uneven sheen.
That third condition matters most. If the finish itself appears to be deteriorating, scraping or adding stronger cleaners may make the problem worse. When the cause is unclear, treat the surface as fragile rather than assuming the residue is removable adhesive.
Reading the Finish on Vintage Pieces
Finish identification can be difficult on older furniture because pieces may have been refinished, repaired, or coated more than once.
Visible clues can sometimes help:
- Varnish or lacquer: often appears as a continuous surface film with a noticeable sheen.
- Shellac: may have a warm amber tone and a relatively thin-looking finish.
- Oil- or wax-finished wood: may show more visible grain and less of a distinct surface film.
These clues are not definitive. If you cannot identify the finish confidently, avoid trying to diagnose it with water, alcohol, solvents, heat, or other reactive tests.
Instead, treat the piece as having an unknown finish, test any cleaning method in a hidden area first, and use the mildest approach that accomplishes the job. For a deeper look at older wood surfaces, our guide on how to revive antique walnut furniture covers vintage-specific care in more detail.
How to Remove Sticky Residue From Wood Using the Least Invasive Method First
Start with the gentlest method and escalate only when the finish and residue are understood well enough to do so safely.
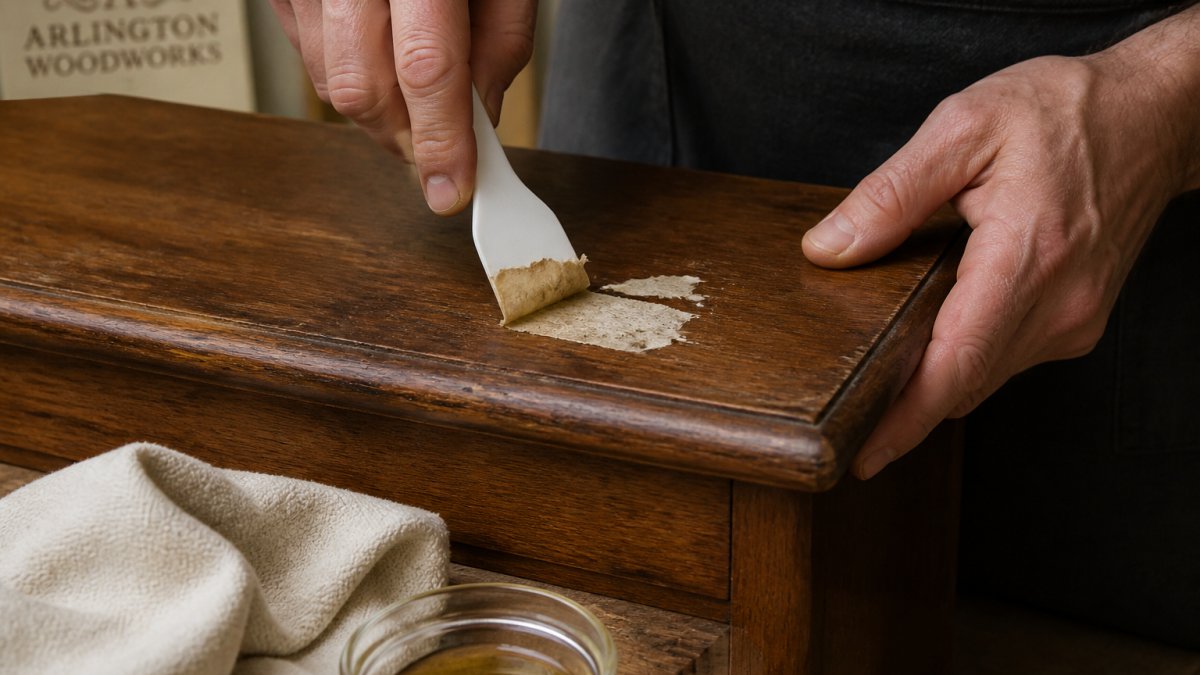
Here is a safer order to follow:
- Lift loose material by hand. Gently peel away paper backing or residue that is already releasing.
- Use a plastic edge if needed. Hold a plastic scraper or old credit card nearly flat to the surface and work slowly.
- Try a barely damp cloth when appropriate. If the residue appears water-soluble and the finish tolerates minimal moisture, use a well-wrung cloth rather than soaking the area.
- Dry the surface promptly. Remove any remaining moisture with a clean, dry cloth.
- Stop before escalating. If the residue remains, identify the finish more carefully before trying oils, solvents, adhesive removers, or stronger cleaners.
A Graduated Testing Protocol on a Hidden Area
Before using any cleaner or residue-removal product on a visible surface, test it in a hidden area such as the underside of a table, the back of a drawer front, or another inconspicuous spot.
Watch for dulling, cloudiness, color transfer, softening, tackiness, or a change in sheen. If anything changes, stop.
A hidden-area test reduces risk, but it does not guarantee that every visible area of an older piece will react the same way, especially if the finish has worn unevenly over time.
How to Remove Sticker Residue From Wood Furniture Without Scratching
The key is to loosen the residue without gouging the surface or over-wetting the finish.
Start by lifting any loose paper or adhesive with your fingers. If needed, use a plastic scraper or old credit card held nearly flat to the surface. Avoid metal tools.
If the residue appears water-soluble and the finish can tolerate minimal moisture, use a clean, barely damp cloth to soften the adhesive gradually. Do not soak the area or leave a wet cloth sitting on the wood.
Work slowly and re-check the surface as you go. If the residue resists gentle lifting, stop rather than digging in or escalating automatically to stronger products.
For more on avoiding common missteps, see our guide to common wood furniture care mistakes.
Can You Use Goo Gone on Wood? What to Know Before You Reach for a Solvent
Goo Gone and similar adhesive removers may remove sticky residue from some finished wood surfaces, but they can also alter older finishes.
On vintage furniture, treat solvent-based adhesive removers as a last resort rather than part of the normal cleaning sequence.
Shellac, lacquer, worn varnish, and previously repaired finishes may dull, soften, discolor, or lift when exposed to solvents. Even if a hidden-area test looks acceptable, another part of the piece may react differently if the finish has worn unevenly.
If you cannot confidently identify the finish, stop before using a solvent. For valuable, antique, veneered, or historically significant pieces, professional guidance is the safer next step.
If you would rather avoid stronger products, our guide to non-toxic wood furniture restoration covers gentler approaches.
How to Clean a Sticky Wood Table: Household Options Ranked by Risk
For a sticky vintage wood table, the safest approach is not to keep escalating through stronger household products. Start with the least invasive method and stop when the finish or residue becomes uncertain.
Method |
Relative Risk |
Best Use |
Main Caution |
|---|---|---|---|
Lift loose residue by hand |
Lowest |
Loose paper, labels, or adhesive already releasing |
Do not pull against fragile veneer or lifting finish |
Plastic scraper or old credit card |
Low |
Residue sitting above the surface |
Keep the edge nearly flat and use very light pressure |
Barely damp cloth |
Low when compatible |
Light, water-soluble residue or general surface grime |
Avoid soaking seams, veneer edges, or unknown finishes |
Mild soapy water |
Moderate |
General grime on a durable, known finish |
Use minimal moisture and dry promptly |
Household oils or specialty adhesive removers |
Higher |
Specific adhesive problems on a finish known to tolerate them |
Test first; they may darken, soften, or alter some finishes |
Strong solvents |
Highest |
Specialized situations only |
Can damage or remove vintage finishes; avoid on unknown surfaces |
How the Low-Risk Options Actually Work
Lifting by hand works well when adhesive is already beginning to release. Work from an edge and stop if the finish starts moving with the residue.
A plastic edge can help separate residue without introducing a sharp metal tool. Keep it nearly parallel to the surface rather than digging downward.
A barely damp cloth may soften some water-soluble residue. Use as little moisture as possible and dry the area promptly.
When Household Remedies Become Riskier
Oils, vinegar mixtures, adhesive removers, and other household remedies are not universally safe for vintage wood. Their effect depends on the existing finish, previous repairs, and whether the wood is exposed.
Do not treat them as the automatic next step simply because gentler cleaning did not work.
If the residue remains after low-risk methods, pause and identify the surface before escalating.
Solvent Handling: Ventilation, Skin, and Disposal
Commercial adhesive removers and other solvents can damage vintage finishes and may also require special handling.
If a solvent is appropriate for a known, compatible surface:
- Follow the product label and safety data sheet.
- Work in a well-ventilated area away from flames or ignition sources.
- Use appropriate skin and eye protection.
- Use the smallest amount necessary.
- Do not pour solvent directly onto the furniture.
For handling and disposal guidance, see the EPA's household hazardous waste information and the manufacturer's safety information.
Aftercare: Remove the Residue, Then Reassess
Once the residue is removed:
- Wipe away any remaining cleaner using the least moisture necessary.
- Dry the surface thoroughly, especially around seams, joints, and veneer edges.
- Inspect for dulling, cloudiness, softening, color change, or uneven sheen.
- Condition only if the surface is compatible, clean, dry, and actually appears to need it.
Conditioning is a separate step from cleaning and should not be used to cover up a failing finish.
Vintage-Specific Precautions and When to Call a Conservator
Vintage and antique pieces deserve extra caution. Veneer can lift, inlays can loosen, and older finishes may be thinner, more fragile, or previously repaired. The goal is preservation, not a quick fix.
Follow these precautions:
- Always test any cleaner or treatment on a hidden area before using it on a visible surface.
- Skip abrasive pads, steel wool, and metal scrapers.
- Avoid heat, steam, and harsh solvents on unknown or fragile finishes.
- Use as little moisture and pressure as possible.
- Stop if the finish becomes cloudy, soft, tacky, discolored, or begins transferring to the cloth.
Consider consulting a conservator or experienced furniture professional when the piece is valuable, historically significant, has damaged veneer or inlay, shows a failing finish, or has sentimental importance that makes trial-and-error unacceptable.
Gentle cleaning may be appropriate, but conditioning or applying a new finish should only come after you understand what is already on the piece and whether the surface is compatible.
Conditioning Dry Wood After the Residue Is Gone
Once the sticky residue is gone and the surface is completely dry, reassess the wood before applying anything else.
If the surface still looks dry, dull, or faded and the existing finish is compatible with conditioning, that is when a wood conditioner may help.
At Arlington Woodworks, our Artisan Furniture Wood Balm No. 524 is made with certified organic flaxseed oil, beeswax, and orange oil.

To apply it:
- Start with a clean, completely dry surface.
- Test a hidden area first.
- Apply a small amount and work it evenly into the surface.
- Let it absorb for a few minutes, then buff away all excess.
No. 524 helps restore warmth and luster to compatible dry or dull wood, but it does not repair scratches, stains, water rings, failing finishes, or structural damage.
If the surface is still tacky, cloudy, soft, or otherwise unstable after cleaning, stop there rather than trying to condition over the problem.
Test a Hidden Spot, Then Choose Your Wood Care Product
Choosing the right wood care product comes down to two things: what finish is already on the piece and what condition the surface is actually in.
Test any new product in a hidden area first, then match the treatment to what you find.
Use this simple framework:
- Bare or compatible oil-finished wood that looks dry or dull: a conditioning balm may be appropriate.
- Film-sealed surface in good condition: gentle cleaning may be all it needs; condition only if the product is compatible with that finish.
- Unknown or fragile finish: use the mildest approach and avoid adding products until you understand the surface better.
- Tacky, cloudy, soft, peeling, or failing finish: stop and address the finish problem before conditioning.
Our wood care selector can help you match a product to the finish and condition of your piece.
If you are new to wood care and No. 524 is appropriate for the surface, the Starter Kit pairs Artisan Furniture Wood Balm No. 524 with a palm wax brush for controlled, even application.

Sticky residue does not have to mean a damaged finish. The safest approach is to slow down, identify what is causing the stickiness, and use the least invasive method that works without changing the surface underneath.
Frequently Asked Questions
How do you remove old sticker residue from vintage wood without damaging the finish?
Start with the gentlest method. Lift loose paper or adhesive by hand, then use a plastic scraper or old credit card held nearly flat to the surface if needed. If the residue appears water-soluble and the finish can tolerate minimal moisture, try a clean, barely damp cloth and dry the area promptly. Test any method in a hidden area first, and stop if you notice dulling, cloudiness, color transfer, softening, tackiness, or another change in the finish. Avoid strong solvents, heat, and aggressive scraping on unknown or valuable vintage pieces.
Can you use Goo Gone on wood?
Goo Gone and similar adhesive removers may work on some finished wood surfaces, but they can also dull, soften, discolor, or otherwise affect older finishes. Treat them as a last resort rather than a routine cleaning step. Follow the product label, test in a hidden area first, and avoid using a solvent on an unknown, fragile, or valuable finish without professional guidance.
What should I try first when a wood surface feels sticky?
First determine whether the stickiness is residue sitting on top of the finish or the finish itself becoming tacky. If you can see or feel a distinct adhesive layer, begin with gentle lifting and minimal moisture if appropriate. If the entire surface feels soft, tacky, cloudy, or unstable, the finish itself may be deteriorating. In that case, stop cleaning rather than escalating to stronger products. A wood conditioner such as Artisan Furniture Wood Balm No. 524 may help compatible dry or dull wood, but it will not repair a failing finish.
How can I clean a sticky wood table without harsh chemicals?
Start with the least invasive method: remove loose residue by hand, then try a plastic edge or a clean, barely damp cloth if the finish can tolerate minimal moisture. For general grime on a known, durable finish, a small amount of mild soapy water may be appropriate. Avoid treating vinegar, household oils, adhesive removers, or solvents as universal next steps for vintage wood. If the table is antique, veneered, valuable, or has an unknown finish, test in a hidden area first and stop before escalating if the surface reacts unexpectedly.


